How To Create A Web Application Database

How To Create A Web Application Database

Tabby Mungai

Tabby Mungai

September 27, 2023

Can making a website make money? The answer is yes. However, it is important to note that making money is not limited to the web development skill set, as a website can increase the revenue brought to a business by having a better understanding of the customer base.

One may ask why a database is important. A business can make a website to make money particularly when it creates a web application database to collect crucial information to improve service delivery for its users. We live in an information age where data has become the new currency, consequently having information of the various users can be instrumental in providing businesses with the information they require to provide crucial services.

In this blog, we will set up the SQLite database to store data and use sqlite3 module to interact with the database available within the standard Python library.

  • In the folder flask1_app create a file schema.sql

  • In the .sql file create a table called posts having the necessary columns with code provided

DROP TABLE IF EXISTS posts;

CREATE TABLE posts (
    id INTEGER PRIMARY KEY AUTOINCREMENT,
    created TIMESTAMP NOT NULL DEFAULT CURRENT_TIMESTAMP,
    title TEXT NOT NULL,
    content TEXT NOT NULL
);

The code in the app.py file below works to set up the database connection in addition to creating a single Flask route to apply to that particular connection.

import sqlite3
from flask import Flask, render_template

app = Flask(__name__)

def get_db_connection():
    conn = sqlite3.connect('database.db')
    conn.row_factory = sqlite3.Row
    return conn


@app.route('/')
def index():
    conn = get_db_connection()
    posts = conn.execute('SELECT * FROM posts').fetchall()
    conn.close()
    return render_template('index.html', posts=posts)

To display the post within the database created it is vital to undertake the following steps.

  • Create a directory named templates

  • Create an index.html and base.html file

The code that will go into base.html file

<!DOCTYPE html>
<html lang="en">
<head>
    <meta charset="UTF-8">
    <title>{% block title %} {% endblock %}- FlaskApp</title>
    <style>
        .post {
            padding: 10px;
            margin: 5px;
            background-color: #f3f3f3
        }

        nav a {
            color: #d64161;
            font-size: 3em;
            margin-left: 50px;
            text-decoration: none;
        }
    </style>
</head>
<body>
    <nav>
        <a href="{{ url_for('index') }}">FlaskApp</a>
        <a href="#">About</a>
    </nav>
    <hr>
    <div class="content">
        {% block content %} {% endblock %}
    </div>
</body>
</html>

This code goes to the index.html file

{% extends 'base.html' %}

{% block content %}
    <h1>{% block title %} Posts {% endblock %}</h1>
    {% for post in posts %}
        <div class='post'>
            <p>{{ post['created'] }}</p>
            <h2>{{ post['title'] }}</h2>
            <p>{{ post['content'] }}</p>
        </div>
    {% endfor %}
{% endblock %}

Having an activated virtual environment within the flask1_app directory the FLASK_APP environment variable is used to tell Flask about the application in this case app.py.

Then set the FLASK_ENV environment variable to development to run the application in development mode and access the debugger.

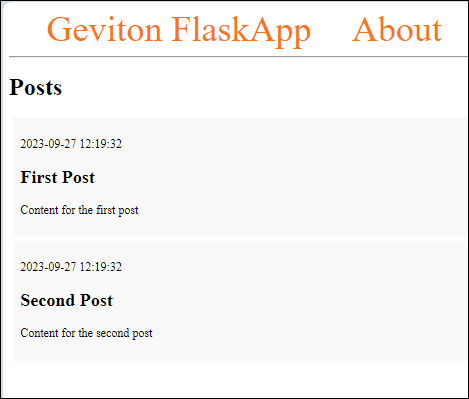
The picture displays posts in the database within the index page that allows user to add new posts.
In the next steps create a new route for adding posts.

Create

Add a new route to the Flask application allowing users to add an innovative blog post to the database that would appear on the index page. Open the app.py file.

Import a few things from the flask package

  • The global request object to access submitted data

  • The url_for() function to general URLs

  • The flash() function to flash a message when the request is invalid

  • The redirect() function to redirect used to the index page after adding the posts to the database

from flask import Flask, render_template, request, url_for, flash, redirect

# ...

Add the following route at the end of the app.py file

# ...

@app.route('/create/', methods=('GET', 'POST'))
def create():
    return render_template('create.html')

The output of the /create route can be seen below: http: //127.0.0.1:5000/create
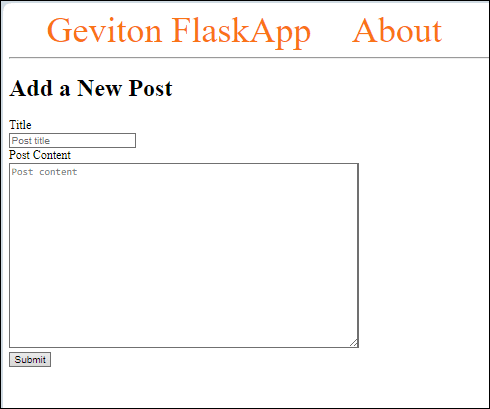
If the form is filled the and you click the submit button nothing happens because the POST request was not handled on the /create route. The app.py file ought to be edited to look like this:

# ...

@app.route('/create/', methods=('GET', 'POST'))
def create():
    if request.method == 'POST':
        title = request.form['title']
        content = request.form['content']

        if not title:
            flash('Title is required!')
        elif not content:
            flash('Content is required!')
        else:
            conn = get_db_connection()
            conn.execute('INSERT INTO posts (title, content) VALUES (?, ?)',
                         (title, content))
            conn.commit()
            conn.close()
            return redirect(url_for('index'))

    return render_template('create.html')

The POST request is handled within the if request.method == ‘POST’

The title and content is extracted by the user by submitting the request.form object.

If the title is empty the flash() function is useful to flash the message Title is required! The base.html file ought to be edited to look like the code below

<!DOCTYPE html>
<html lang="en">
<head>
    <meta charset="UTF-8">
    <title>{% block title %} {% endblock %} - FlaskApp</title>
    <style>
        .post {
            padding: 10px;
            margin: 5px;
            background-color: #f3f3f3
        }

        nav a {
            color: #d64161;
            font-size: 3em;
            margin-left: 50px;
            text-decoration: none;
        }

        .alert {
            padding: 20px;
            margin: 5px;
            color: #970020;
            background-color: #ffd5de;
        }
    </style>
</head>
<body>
    <nav>
        <a href="{{ url_for('index') }}">FlaskApp</a>
        <a href="{{ url_for('create') }}">Create</a>
        <a href="#">About</a>
    </nav>
    <hr>
    <div class="content">
        {% for message in get_flashed_messages() %}
            <div class="alert">{{ message }}</div>
        {% endfor %}

        {% block content %} {% endblock %}
    </div>
</body>
</html>